Another Inkodye pouch

I've made another Inkodye tutorial, this time posted on the Etsy blog. Click here to read about this fancy lady pouch project.


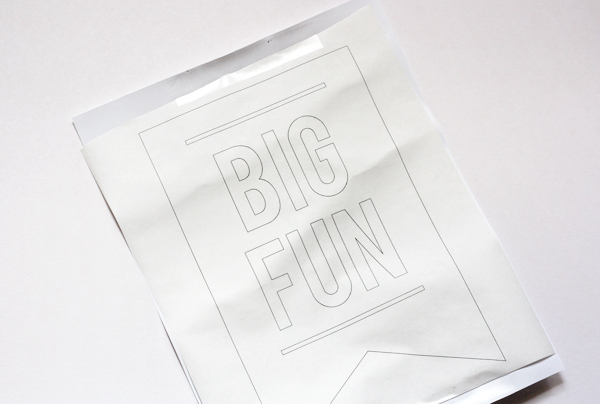

 With an iron set to the appropriate temperature for your fabric (likely the cotton setting), iron the paper pieces to the tote, shiny side down. The iron will very slightly melt the plastic coating, sticking the paper to the canvas. Give the pieces an initial quick, light press to make sure they're where you want them. If not, peel them up and reposition. Then press down firmly with the iron and make sure all the edges are sealed so no dye will seep under them. Once they're stuck down, the pieces are really stuck, and will probably tear if you try to peel them off.
 If there are any areas you're worried about getting dye— you know, if you tend to lose your mind a little and start painting outside the lines— mask those off with painter's tape. Place a piece of freezer paper inside the tote to prevent any dye from soaking through to the back side.


My latest experiment using Inkodye, a photo-sensitive dye that changes color in sunlight, is posted at SheKnows.com. Head over there to see the full tutorial.


I played with Inkodye again—a photo-sensitive dye that uses the sun to develop prints on natural materials like wood and fabric. One nice thing about using this dye instead of fabric paint is that fabric stays soft and flexible, instead of stiffening like it does with paint. Plus watching prints develop is always fun!

I made a simple cloud design this time, since I knew that achieving perfectly crisp edges is tricky due to shadows that might occur. And clouds can have soft edges, so if that's what happened, all the better.

To make your own cloud print, you'll need Inkodye, fabric, a foam brush, a large piece of cardboard wrapped in plastic for your work surface, masking tape, cardboard for cutting out shapes, a pencil and scissors.

Sketch clouds onto cardboard. You could use a cereal box or other recycled cardboard for this; avoid regular paper since it might let light through and it will curl more easily if it gets damp.

Cut out the clouds.

Tape the edges of the fabric to your work surface to keep it in place while you brush on dye. (My "work surface" was a piece of corrugated cardboard wrapped in a garbage bag, which worked great.)

Mix up your Inkodye solution. It's fine to use it straight from the bottle, but it's very concentrated so you can mix it with water to stretch it. Use a 1:1 ratio of dye to water, and colors will still be vibrant. I used about 1/4 cup of each for this project.
In a dim room away from direct sunlight, quickly brush the dye evenly over the surface of the fabric.

Then blot up any excess dye until the surface feels barely damp. Less moisture will keep the cardboard shapes from curling up.
Arrange the cloud cut-outs over the fabric. Then carry the board into a sunny area, set it down, and don't move it while the dye develops. (About 8 minutes on a sunny day, 15 on a partly cloudy day.) For best results, expose prints around noon when the sun is directly overhead; it will help reduce cast shadows.

It's helpful to weigh down your shapes to prevent curling; I used some stacks of coins. Place them quickly to prevent the cardboard from shifting. Once exposed to sunlight, the dye will begin turning color within seconds. When your print has been exposed long enough, bring it back inside before removing your shapes. Remember, the unexposed areas will immediately begin to turn color if you remove the cutouts outside, so resist the urge to peek immediately.

Quickly begin washing out the excess dye in hot, soapy water, scrubbing thoroughly. Rinse, and you're done! The resulting print will be permanent and machine washable.

If you'd like to give it a whirl, Inkodye is available here.


 Another project in the Inkodye series. This time I tried to get fancy with the light-sensitive dye and see if a drawing could be transferred onto fabric. (Click the image above to view a little larger.) Mixed results this time.
 To make this fabric, I stretched out a piece of Saran wrap and taped down the corners to keep it taut. Then I drew on it with a black DecoColor paint pen. I needed something very opaque that would write on plastic, and this was perfect.
 I thought the fine lines would be a good test to see how crisp the final print would turn out.
 Then I removed the drawing and taped a piece of white cotton to my waterproof surface (i.e. cardboard wrapped with plastic). I applied red-orange Inkodye with a foam brush. Next I blotted off as much dye as I could. This was recommended in what I'd read on the manufacturer's site. Apparently if you plan to cover your damp surface with plastic or a piece of glass, water will tend to condense on the underside of the glass. And that will produce pale spots on your print. The idea is to get your surface as dry as possible, so let's see if the blotting method solves the problem.
 I stretched the Saran wrap drawing over the treated fabric and taped it down, then placed the fabric in direct sunlight for 5 minutes. I was bummed to see some condensation start to appear between the plastic and the fabric, sure enough.
 When the color looked fully developed, I immediately brought the fabric inside, untaped it, and rinsed it under a faucet. Then I washed it thoroughly by hand in water with laundry detergent. Overall the design is cute, but you can see light areas where water from the condensation diluted the dye. They're noticeable when you click the first photo in this post to view it larger. And some of the lines aren't as perfectly crisp as this stickler would like. The upshot: if you want a perfect print, this probably isn't the method to use. But it was fun!
 Someone wondered in the comments on a previous post what the back side of the dyed fabric looks like. Here it is. And I haven't washed this in the machine yet, but I'll give you a report when I do. I don't expect the color will fade much, if at all.
Update: After machine washing, I'd say the color faded a little bit. But not too badly.
You can check out previous projects using Inkodye here and here.