How About Orange
Showing posts with label tutorials. Show all posts

May 17, 2011

Photography DIY: how to make your own bokeh shapes

I've seen photos created using a DIY camera trick and couldn't resist testing it myself. Bokeh is the term for the out-of-focus areas in a photo, particularly those little highlights created when photographing small points of light. Usually those highlights are circles or polygons, but it's lots of fun to make your own shapes.

You'll need a DSLR camera and a lens with a large aperture. I'm definitely no photography expert, so refer to this good article for info about lenses and settings for taking shots with bokeh. I used my Canon Digital Rebel XSi with a Canon 50mm f/1.8 lens (this is my only extra lens; it's relatively cheap, lens-wise, and I love it).

You'll also need a piece of black paper, pencil, scissors, tape, and a craft knife or decorative paper punch.

Cut a strip of paper long enough to wrap around your lens. I made mine 10" x 1.5". I put a strip of tape along the entire length of one edge so it would be easy to peel pieces of tape off this smooth area, just in case I wanted to switch my shape cutouts later. Wrap the paper strip around the outside of your camera lens to form a cylinder and secure it with tape.

Then set this paper tube on a piece of black paper and trace around it. Cut out the circle. This will be the cap on the paper tube that fits over your lens. Use a paper punch or Xacto knife to cut a hole in the middle of the circle. Make the shape somewhere between 1/2" and 3/4".

I used a knife to cut a cloud, asterisk, and tulip. Tape the paper circle to the tube to form a cap that will fit neatly over your lens.

To test this little project, I needed some tiny points of light, so I threw some Christmas lights on a clothes rack (in daylight, but nighttime shots are cool, too). Then I fitted my paper cap over the lens and made sure my aperture was open as far as it would go.

Focusing on my finger held right in front of my camera caused the background to go out of focus. I moved my finger away, took the photo, and got this:

Success!

Putting an object in the foreground is fun, too. I totally amused myself and recommend you try this.

May 16, 2011

Sew a wallet that turns into a tote

Sew Mama Sew has posted a tutorial by the super clever Lorraine of Ikat Bag today—how to sew a little zippered wallet that unfolds into a bag. Like a transformer. It's an Autobag, or maybe a Recepticon. Thanks for featuring my fabrics, Lorraine!

P.S. The Needle Shop, who manufactured my latest line, is now offering Outside Oslo fat quarter bundles. Get small pieces of all the prints as a set right here.

P.P.S. Sorry to the nonsewers for all the fabric-centric posts lately. I'm always a little giddy after a new line comes out!

May 12, 2011

Make a bookshelf cover

A project by Carol Zentgraf for the Creative Home Arts Club uses fabrics from my first line, Modern Flora. Get the instructions for making this bookshelf cover right here. (The bottom of the article shows more photos and figures mentioned in the directions.) I'm not one for putting skirts on things, including on myself, but I can see how this would be useful if you need to hide a lot of unsightly junk or perhaps small children.

May 10, 2011

DIY decorating with masking tape

I love to peel and stick things. Especially orange things. Here's an easy way to customize plain ceramics: apply decorative tape in colors that match your home, your party decorations, or your current bouquet of flowers. Dress up inexpensive vases for DIY wedding table centerpieces or showers. And when you get tired of your design, just peel it off.

Stick tape onto a piece of wax paper and slice it into thin strips to make asterisks or bunting strings. Cut the other shapes off tape rolls with a scissors.


Sources for pretty masking tape include Happy Tape, Cutetape, and Ginko Papers.

April 20, 2011

Make flowers from crepe paper

Ages ago I bought a package of crepe paper (like this—the folded sheets, not streamers). An impulse purchase simply because... it was orange? The other day I finally made some flowers with it while watching way too much HGTV. These will be nice gift toppers, or maybe I'll do more and make a wreath.

Materials:
Sheet of crepe paper
Small piece of cardstock
Scissors
Glue (I used Aleene's Tacky Glue)
Toothpick

Cut 12 circles from a sheet of crepe paper, any size you like depending on how big you want the final flower to be. I accordion-folded a strip of paper and cut multiple circles at once. No need to be too precise; freehand circles will do.

Orient each petal so the grain in the paper runs vertically. Apply a bit of glue at the bottom of the petal and pinch it to create small gathers. When the glue has dried, press both thumbs into the center of each petal and stretch the paper to curl the edges inward, forming a bowl shape.

Cut out a small circle of cardstock (about the same size as the petals before you shaped them.) Glue five petals around the outside edge. Then stagger four petals inside that ring, followed by three petals in the middle.

To make a center for the flower, cut a small strip of crepe paper and fold it in half. Cut notches along one long edge of the doubled paper to make fringe. Roll the fringed paper around a toothpick and secure with glue. Finally, glue this piece into the center of the flower.

April 14, 2011

DIY tutorials for the home

Links to instructions for making these lovely items are below. Go nuts!
Pleated pillow at Presser Foot
Butcher paper wreath by Alisa Burke
Asterisk clock from Curbly
Webbed chair seat repair at Martha Stewart
Tiny polaroid magnets from Ambrosia Girl, inspired by my Pantone magnets!
Sunburst pillows at Versus by Anna of Noodlehead

April 13, 2011

Origami bunny favor boxes

You know I have a weakness for 3D paper anything, so when I saw an instructional video for origami rabbit cups designed by Jacky Chan at Origami Spirit, I had to try it. The video moves along briskly so I had to rewind repeatedly, but I prevailed. Hey, now that nobody uses tape anymore, is it still called rewinding? What's it called? But I digress. Go fold some Easter bunnies. If you use 6" origami paper, an egg will fit nicely inside.

April 06, 2011

Tote bag tutorials

People with lots of stuff to carry might benefit from some tote bag sewing instructions. Lucky for us, nice people of the internet have come through. A few tutorials:
Mini tote by Hollabee
Pleated beach bag at Thimble
Organizing tote basket by 2 Little Hooligans
Market tote at Bijou Lovely

March 28, 2011

Shiny map magnets

Remember last week's shiny Pantone magnet project? I'm on a shiny kick right now and decided to test another type of glaze. Hopefully the repetition isn't so dull that your eyes... ugh, it's too cheesy; I can't finish the sentence.

I glued pieces of a map to wooden disks with plain old garden-variety Mod Podge. Then I applied special Mod Podge Dimensional Magic to the surface of the paper, let it dry, and stuck magnets on the back. No unicorns, leprechauns, or rabbits in hats materialized, but I can report that after the stuff was dry, the surfaces of the disks were super glossy. Probably not captured to full effect in this photo, I'd say the stuff gets shinier than Aleene's Paper Glaze, though it doesn't create quite as thick a coating since the liquid is thinner. It dries in about 3 hours as opposed to 24 like Aleene's, and because the directions say to shake it gently before using, it tends to get tiny, almost unnoticeable air bubbles in in. Which didn't bother me at all, but maybe next time I'll shake less. Here's what it looks like wet:

I like both products a lot and am making plans to glaze everything in my house.

March 21, 2011

DIY Pantone chip magnets

I try to keep loose Pantone chips in an envelope for future projects, but these nice colors escaped and attached themselves to my file cabinet.

If you happen to own a Pantone chip book or can beg a few chips from someone you know, here's how to whip up some little candy-like magnets.

Cut small pieces of bookboard or other thick cardboard with an X-acto knife. (Bookboard is likely available at your local art store or PaperSource.) Make the pieces exactly the size of the Pantone chips. Then paint the edges white; I used acrylic paint for this.

Attach the chip to the cardboard. I tried using wet glue, but it made the chip curl. So instead I covered the back of each chip with double-stick tape which worked great.

Then cover the face of the chip with paper glaze. It dries with a clear, raised glass-like surface. There are a few products on the market; I used Aleene's Paper Glaze. Let it dry overnight.

Finally, attach a magnet to the back. I used a roll of self-adhesive magnet material, but you could use something stronger, or cut up those promotional magnets you get sometimes from companies.

March 18, 2011

Make origami boxes shaped like candies

I tried making these little paper boxes shaped like candies, designed by Makato Yamaguchi. They're a project in a Toyo origami kit for boxes shaped like various sweets. Each candy half is one sheet of folded paper; one end fits inside the other to form a container. You can watch Heather's nice video tutorial right here on YouTube. Collapsing the candy ends is tricky, but I'm improving with practice!

Update: The video I used is no longer available, but here's another tutorial.

March 07, 2011

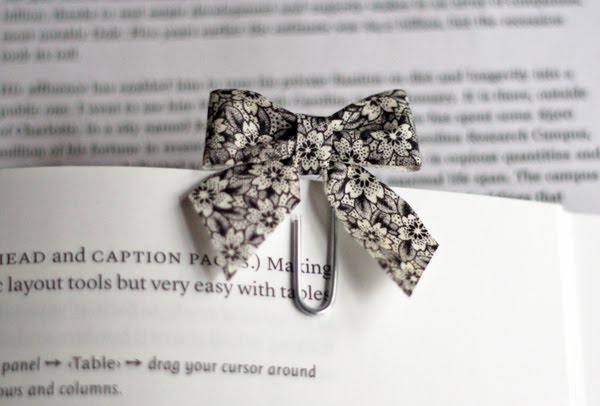
Bow tie paper clips from fabric scraps

I had a couple little scraps left over from stiffened fabric projects, and after fiddling with them, I noticed they'd easily make tiny bows. Which I attached to paper clips because... I don't know why. These could work as bookmarks, on wedding invitations, Valentines, etc. Or attach the bows to hair clips for little girls or pencils for bridal shower games.

I used fabric scraps, stiffener, large paper clips, a scissors, an iron, twist ties (or wire), and a hot glue gun.

Apply stiffener to your scraps (learn more here) and iron them flat. Cut three pieces for each bow in roughly these sizes:
Bow: 4.5" x 0.75"
Tails: 3.5" x 0.75"
Center band: 1.5" x 0.25"

Form the longest strip into a loop, overlapping the ends generously. Then pinch down at the center to form a bow shape. The nifty thing about the stiffened fabric is that the edges won't fray, and it will keep its shape as you bend it around. If you don't like the bow you made, iron the fabric flat and start over.

Pinch the "tail" strip in the center the same way. Yank it around some and show it who's boss.

Then attach the bow to the tails using a piece of wire. I cut the green paper edges off twist ties I'd once pilfered from the grocery store. Worked great. Twist the wire tightly to secure it and clip off the excess.

Use the tiny remaining strip of fabric to attach the bow to the paper clip. Trim it as needed and wrap it around the bow and clip, and securing it with a bit of hot glue.

Trim the tails to the length you like.

March 03, 2011

Nice things to make by hand

Here's a round up of DIY tutorials for handmade things, because looking at them is almost as satisfying as making them. If you can sew, that is. Non-crafty types might find "just looking" plenty satisfying, as attempting to reproduce them might cause hair loss and cursing. Been there. Done that.

Crocheted flowers by The Adventures of Bluegirlxo
Appliqued pillow at Fiskars
Retro apron at Sew4Home
Tea wallet by Handmade Therapy
Gathered potholder by Prudent Baby
Zipper brooches at Craft Stylish

February 22, 2011

Recycled gift bows: yellow pages version

Here's a less pointy variation of the magazine gift bow. I used the yellow pages this time.

Cut 1" wide strips from pages removed from a phone book. Stacking several sheets and slicing them lengthwise with a paper cutter or rotary cutter is quickest. If you are one of the three people who still use the yellow pages, make sure you don't remove any sections you might need someday, like Clowns or Paternity. (Yes, those are real.)

Cut 5 or 6 full-length strips, depending on how full you'd like the bow to be. Cut 4 strips that are 3" shorter. Save one of the leftover short ends to use in the center of the bow.

Form each strip into an "eight" shape, securing the ends in the center with tape. (The photo above shows five shorter loops, but I ended up using only four.) Make a loop with one of the 3" leftover ends.

Arrange the longer pieces evenly to form a circle and staple it in the center. Swinging open the stapler helps position it without squashing the loops.

Repeat with the shorter set of loops. Then layer the smaller piece on top of the larger piece and staple them together in the center. Attach the single loop to the center with a piece of double-stick tape.

February 18, 2011

Origami mushrooms

Small paper mushrooms have sprouted on my desk. Each is folded from a quarter sheet (a 75 mm square) of origami paper. I used a hole punch to cut out spots and attached them with a dot of glue. What am I going to do with these? No idea. But they're cute. Get folding instructions here at Origami Club.

February 10, 2011

Quirky tutorials for children's things

These projects make me smile. Maybe you know a kid's room that needs something here:
Owl stuffies at Hammer and Thread
Funny coat hooks by Giddy Giddy
Toadstool seat by Tao of Craft
Fox lamp at Matsutake

February 09, 2011

DIY freezer paper stenciled scarf

Inspired by the frozen boulders the city snowplow piled up along our street, I made a scarf.

To make this, you'll need: fabric, freezer paper, scissors, iron, pencil, craft knife, cutting mat, fabric paint, and a foam brush. I used a length of jersey from the fabric store—you know, T-shirt material. Soft and comfy, and doesn't fray around the edges.

I sketched an abstract design onto the uncoated side of the freezer paper. These were just messy hexagons and pentagons that got gradually smaller. A pattern of all straight lines is much quicker to cut than curves. Since I wanted the graphic at both ends of the scarf, I traced the original design onto a second piece of freezer paper.

With an X-acto knife, I cut out the shapes. Each piece took about 20 minutes—though I was watching HGTV at the same time, so you might be more productive and less likely to cut off a limb if you pay closer attention to what you're doing.

I ironed the stencil shiny-side down onto the fabric. The freezer paper sticks like magic.

Using a foam brush, I painted in the shapes. Be sure to place a garbage bag or something protective under the fabric just in case a little paint soaks through. I used Pebeo Setacolor fabric paint, but I wasn't thrilled with the coverage. That stuff is washable after you set it with an iron, which is great. But I wanted a more opaque white, so I brushed on a second coat of white acrylic paint. Will it wash off? Probably not. Do I care, because I ever wash scarves? Probably not. (Next time I might get some Tulip brand Soft Fabric Paint and try that.)

I let the paint dry and tore off the paper stencil. Then I trimmed along the scarf edges with a rotary cutter so the design would extend off the sides.

All done.

January 20, 2011

How to make a fabric rose

It's the last stiffened fabric project and then I'm moving on! I wanted to try an oversized, realistic fabric rose just for fun.

Make a template with six petals. I traced around a dinner plate and a small bowl on the back of some ugly wrapping paper. (Tip: if the paper is too curly, iron it flat and your life will be better.) I've included my feet so you can admire my cute socks.

Prepare some stiffened fabric. See here for how I did this. My fabric pieces were too big to lay flat in my microwave this time, so I draped each piece over a couple drinking glasses and nuked them one by one. The fabric came out stiffened in a odd shape, of course, but ironed flat easily.

Using the template, cut three flower shapes from the prepared fabric. Grab a shape and fold it in half to make a crease between petals. Open, rotate the flower, and repeat twice more until six creases radiate from the center.

In the first flower, cut a slit along one of the fold lines to the center. In the second flower, cut out one petal segment. In the third flower, cut out a piece with two petal segments. Save these cutouts; they'll form the center of the rose.

On each flower, overlap the two petals adjacent to the slit and secure with a little glue. (I used Aleene's OK To Wash-It Fabric Glue.)

While they're drying, curl the double-petal and single-petal cutouts. Heat each petal with an iron and roll the rounded edge back with your fingers. When it cools, heat the triangular point of the petal and roll it into a cone shape that's rose-like. This part is tricky! I had to iron the petals flat and start over a few times until I had something reasonable. The one-petal piece should be able to fit inside the two-petal piece when you're done.

Heat the remaining flower petals one at a time with your iron and curl the edges back.

At this point I stacked the pieces to see if they looked nice. Yes! But I decided a flat bottom for this flower might be more useful.

So I cut off the point. (If you're going to do this, I'd suggest trimming when the pieces are still flat: fold them into a cone shape and snip off the points before you glue.)

I hot glued the petals together at the base, then added a felt circle to hide the trimmed ends. I could see these as DIY wedding decorations, attached to curtain tie backs, used in romantic centerpieces, or gathering dust in my box of finished projects I have no idea what to do with.