I experimented some more with the laser toner reactive foil I got from
Decal Pro FX. I ironed the foil onto black laser prints on colored cardstock to make these bookmarks and cards.
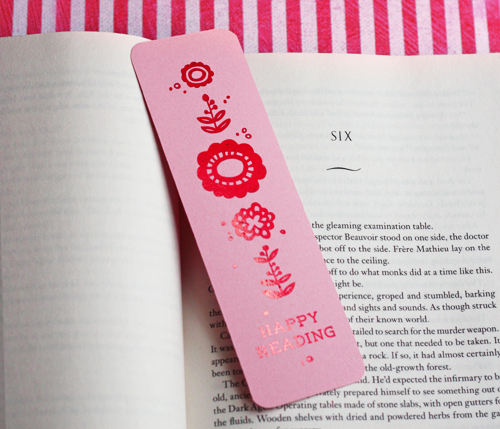
See this post for a more detailed how-to. I did everything the same way, except this time I used Decal Pro's carrier board as my ironing surface. I think this worked slightly better than chipboard since it's very smooth and doesn't warp when heated.
I reused the little flowers I'd drawn and scanned for the
printable business card project here.
I like the foil best on dark paper, since the metal contrasts nicely when it gleams. Plus dark paper hides any tiny specks of toner that aren't covered by foil. Laser printing on the black cardstock worked well, though the flowers looked a little blotchy and strange (above). But the foil still adhered well.
I guess I'm easily amused, but peeling it off is totally thrilling.
This time I tried a two-color design. I printed out just the parts that would get the first color, then ironed silver foil on.
Then I ran the foiled paper through the printer again, printing just the leafy stems this time. I ironed gold foil onto those. Foil won't stick to itself, so no gold got into the silver. The smooth, mirror-like surface of the silver foil did get a teensy bit duller or more textured on its journey through the printer, but that's barely noticeable.
If you'd like the files I used, feel free to download:
Printable bookmark PDF
Printable birthday card PDF (This file is three pages. Print
only the page you need at 100%: first color page, second color page, or the entire design.)
Purchase individual foils or a sampler pack
right here.


25 comments:
Love the black contrast with the foil. Looks really stunning. Does the foil stay on well? Is it as good as the foil you get on professionally embossed cards etc? Just wondering for example if printing business cards as you mentioned, whether the foil rubs off or fades when put in a wallet.
The foil definitely will stay on. I tried to scratch some off with my fingernail and nothing happened. But if you want business cards, I'd have them professionally done. It's too time and labor-intensive to make lots of prints. My arm got tired from ironing after a handful of prints because you have to press really hard!
Plus you'll probably get some rejects and imperfect prints. Have a pro do it, if it's business cards.
I love the bookmarks! Happy and fun. Great job, Jessica Jones.
Tina*:)
Those are so pretty! You can make a card for me with that sometime!
I laughed when I read the line about peeling. Kinda like peeling sunburn, eh? ;)
Mum(knows)
YES. I LOVE peeling! Except potatoes. I also love when you buy a new electronic thing with a screen, and you get to peel off that clear plastic film. Delicious.
I love reading and bookmarks! I loved your bookmarks! You should make more and let us download some *-*
Can't you also put the foil attached to the card back through the laser printer with a blank screen. Does that make sense. I used foil like these years ago...Printed black design on card, attached the foil with little stickers on corners and ran it back through the laser printer. Done.no ironing necessary, although that was an alternative.
Glo
I haven't tried this yet, since I asked the manufacturer about that and it sounded unlikely to work. I guess due to the static charges in all laser printers, it's very difficult to prevent wrinkles. And you need high pressure on the foil, which is why they recommend running the foil through a laminator which applies hundreds of PSI as it passes through. I'm not sure the laser printer will apply enough pressure.
But maybe sometime I'll give it a try.
I haven't used how to use, but I downloded your bookmark pdf. Thank you! I've been looking for a good one for my students, since they need more bookmarks, but how can I use it? Print out on light-colored paper and laminate them, maybe? I'm not going to make that foil ones now, but it seems interesting! Ah, I just hope you live near here...
I wish you lived by me!!! I'll send you an email with additional bookmark thoughts. :)
I love the bookmarks! They look great.
Jessica - It sounds like you only needed the foil pieces themselves (i.e., the sample pack or the rolls of foil) and not the starter kit that the website sells. Is that right? Thanks!
Yep, that's right.
Love the contrast on that first bookmark! I'm definitely going to have to try it out and see what I can make. :)
Hi Jessica,
I am gearing up to try this. I thoroughly enjoyed your tutorial and am very excited to try. Do you suggest purchasing the carrier board? Was it worth the additional investment, and, or do you think there is any sort of substitute for it? It's a bit pricey, but I would buy it if you felt it really made a difference in the quality of your finished product.
Thanks so much for all the hard work you put into your blog. It's one of my favorites and I look forward to every post!
I haven't used it a ton yet, but I also got good results just using chipboard (thin, smooth cardboard), before I had the carrier board. Personally I think you can skip the carrier board and try it without first.
Laser toner reactive foil is a revolution! I've got such a soft spot for graphics on a black background.
CHRISTMAS CRAFTING HERE I COME!
Wanted to say I finally got it working. It really does depend on your printer.
I exchanged my laminator for another and got the same results. Finally I tried my home laser printer last night, which isn't as high quality, but figured why not. BAM, almost a perfect print, just edges are not as crisp etc. Might try some various prints from staples.
For the person asking about the carrier board, I didn't buy it and have been using chipboard under 80# cover stock, and it worked perfectly now. Or I was running 100# through on its own.
Ihttps://dl.dropbox.com/u/24423939/foiledagain/foiled.jpeg
you can kind of see how the text is not crisp, but it is pretty small. at normal viewing distance it's not bad.
Interesting that the printer makes a difference! I wonder if the paper does, too? Or the humidity, or how the stars are aligned? Because I tried some prints on a different type of cover weight paper the other day and couldn't get a single good transfer. Still using the iron since i'm only doing small areas and got it to work pretty well. But maybe I need to upgrade to the laminator.
Your print looks cool.
The bookmarks are fantastic!
Nice work.
Hi Jessica,
They look amazing for a DIY job! I was just wondering if you know of by any chance, suppliers who ship to Australia?
Anyway, great job!!
Steph
I don't know about shipping to Australia, sorry!
No worries! I got some and am busy experimenting at the moment - yours look stellar! Thanks for the examples :)
Hi, do you know if you could print over the foil once it is applied to the paper?
Doubtful--running it back through a printer might damage the smooth finish on the foil (heat, rollers, etc) and the toner probably won't adhere to it very well. But only one way to find out!
Post a Comment