

How to make gift bags from newspaper
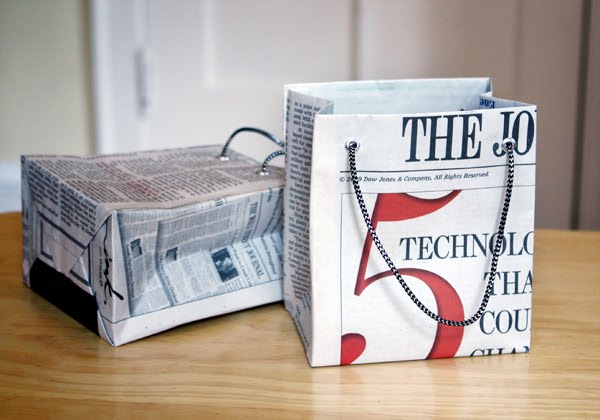 When I bought something at a store recently, the clerk handed me my purchase in a bag made from a newspaper. I liked it very much and had to make some more—thus today's DIY recycled newspaper project: gift bags made from the Wall Street Journal. You can vary the dimensions, of course, but here's what I used to create a bag that's 5" tall, 4.5" wide, and 3" deep.
 Stack two sheets of newspaper on top of each other. This will be a two-ply bag for extra sturdiness.
Cut out a rectangle that's 15.5" wide and 8.25" tall. If your paper already has a fold in it, align the existing fold with one of the fold lines in the diagram below, unless you don't mind an extra fold appearing somewhere on your bag. I cut out this rectangle, then flipped the paper over so the blue area would be on the outside of the bag. Fold a flap 1.25" down from the top. Fold a flap 2" up from the bottom. Then measure off and make vertical folds in the places shown in the diagram above. The front and back panels are 4.5" wide, the side gussets are 3" wide, and you'll need a 0.5" flap for gluing the bag together.
Cut two pieces of cardstock or chipboard to 4.25" x 1", then glue them on the widest two panels just under the top fold. These will reinforce the rim of the bag. Glue the top flap down along the length of the bag, covering the cardstock. Since the bag is two-ply, you'll need to glue both flap pieces down one at a time. Put glue on the outside of the 0.5" tab and bring the left-most panel over to form the body of the bag, aligning the cut edge of the panel with the folded edge of the flap. Add a little more glue to make sure the outermost sheet of newsprint gets tacked down, too.
 Upend the bag so the 2" flap is now up. Fold the short sides inward as if you were wrapping a present. If it seems easier, you could also lay the bag on its side and crease those folds against the table.
 Put glue on both flaps and fold them inward to form the bottom of the bag. Standing the bag upright and pressing down from the inside will help to secure them.
 Cut a piece of chipboard to 4" x 2.5" and glue it to the bottom of the bag to reinforce it and hide the flaps if you want to be an overachiever.
 Punch holes in the rim of the bag, adding eyelets if you like, and string some cord through the holes to form handles. Knot each end of the cord so it won't pull out through the holes.
If you want to store your bag flat, pinch the top together, fold in the sides, and bring the bottom up so that it lies flat.
252 comments:
«Oldest ‹Older 1 – 200 of 252 Newer› Newest»Oooh, I like this! Thanks for sharing how to make it. :)
I saw this idea at Cargo in Portland and I love it! Great diy.
This the greatest thing I've seen all day. :) And it's just in time for my sister's and nephew's birthday! Oh, and it's economical and environmentally friendly!
Sara, uh huh, that's where I was shopping!
I made some last year following another tutorial on the internet and they were, not only easy, but very fun to make! Plus, the persons to whom I gave them were so delighted and impressed by them! Definitely worth trying!
The more I read this blog, the more enamoured I get by the idea of party bags. This may be the straw that breaks the proverbial camel's back. Now to find a party...
I love making bags for all sorts of things, I normally use this tutorial.... I find the bottom on this one much easier and holds better because of the inner folds.
http://www.youtube.com/watch?v=pSfusvAP1vw
Cool, thanks for the tip! Plus I love how that guy says "stahp-ler" and "pah-per."
Cute! I've seen ones from wallpaper samples. They wrapped them around a stack of books to help them fold the bottom corners in.
I really like these ones, though.
Oh I love this! Really, you could use any kind of paper. Hey maybe that's what to do with saved wrapping paper... :P
You have a really cool blog. Thank you for the instructions on how to make the bags, it is a good idea.. will have to try it the next time.
amazing!! thanks!
Very cool!!!! Will definitely try! Thanks for sharing the how-to!
LOVE this!!! Thanks!
Love this great idea!! I've gotta make some. For gifts for kids, I'm going to use the Comic section... Thanks again!
RRR, love it!
But didn't your fingers get black from the ink?
Fabulous-I'll pair them with your magazine bows! Perfect match :)
Mum, maybe just slightly gray. Not bad.
"Oh my gosh that's the cutest thing I've ever seen, I have to make them!" people started looking at me weird at the office I guess I shouldn't have said that out loud--I just got so excited!
OMG!!!! I love it they look fabulous!
Thanks for sharing! I'm so going to try this the next time I give a gift :)
Love this :) I'm going to make one for my boyfriend's graduation present!
I'm so excited to try this. Thanks for the tutorial
Tricia
Cute, Thrifty and Easy. Just how I like my projects. Can't wait to give it a try. Thanks!
Kat
BlackKatsDesign.blogspot.com
thank you!!! great idea :)
Super cute! Way to recycle!
looooooooooooved it!
:)
clau
OKAY! this is divine!
xo.
This would be cool to make with newspapers from your place of travel if you are bringing home souvenirs for family or friends.
this is just the most eco-friendly tutorial ever! thanks for sharing Jess!
Love, love, looooove this! Thank you so, so much! :)
I love these, cant wait to make some.Thanks.
This is such a good and cute idea!
Oh! I just love it!!!!!
what a great idea and a good way to recycle too!!
Linking this to my blog 7.21.10. Totally just stole your picture, too. This is FAB. And yes, you'll get full credit. :)
great idea!thanks for sharing
I've always wanted to know how to make these...thanks a bunch for sharing! A couple of C'mas' ago - I bought gifts at a store that has only n-paper bags. I saved them all & gifted the items in the bags instead of putting them in wrapping paper. Everyone loved it and saved the bags to re-use! Will be great to make some on my own!!! Thanks again Cheers,
Avril
Brilliant! Can't wait to try it.
Love this - I also make gift bags with wallpaper - they are really strong and I sew them instead of stick them :o) There's a pic (a rather bad one - sorry) on my blog here http://michellemadethis.blogspot.com/2008/11/wallpaper-bags.html
M
Excellent, so cute!
This is awesome, thank you!
I think these would be fun to make out of the comics or with a wedding or baby announcement! thanks for sharing!
wow this is awesome. i wonder if you could laminate them to make them waterproof? anyway great idea.
So clever! Thank you for sharing. I think I'm going to start making bags now so I have enough for Christmas gifts this winter! :-)
http://minimalinfluence.blogspot.com/
This is great! Thanks for sharing; I can't wait to make some of these bags :)
This is so great. Can't wait to try it! Also if you're worried about the print smudging onto light colored gifts, I bet spraying it lightly with workable Fixatif would take care of it.
I was gonna ask what GG asked! Our local paper is especially bad for turning one's fingers dirty!
But the bag still rocks!
Amazing! Genius! I'm so trying this!!!
Great project idea, Jessica! I'm going to use my plethora of old maps for this, make the bag bigger, wrap it in either contact paper or packing tape and use it as a cool lunch bag.
Thanks!!
Darci, that sounds pretty darned awesome.
This is such a fantastic recycling idea. I think I'll use this idea to make favor bags for my son's first birthday. Thanks!
LOVE this! I'm totally going to try this with some fabric.
speaking as a party bag seller, I think they are fantastic!
I absolutely love it! I think I'll try this with my daughter today.
Great idea! I think I will have to try it with wallpaper or wrapping paper. I have issues...I hate touching newspaper!
How black were your fingers?
This is one of the most awesome things I've seen in a long time! So great!
Well done!!
They are certainly different, recycle paper and are a sure fire attention getter.
this is such a creative idea and great for recycling old papers!
This is great, thanks!! I especially think it would be good for a special occasion - using the front page with a date on it, or an announcement page, or a comic strip.... lots of ideas!
ooo you made it easier than I have ever done. I used to try to form them around a box the same shape or a brick. . . duh just fold it BEFORE you start making the bag. I've made dozens of these in the past and almost felt like they weren't worth it. Now you have remedied that. Thanks I put it on my blog in my list of tutorials.
~a
love them, and marg, you made me think about using maps to make souvenir gift bags, thank you! We're always buying t-shirts or crafts from the beach trips to bring home to loved ones.
Love this idea, I also use wrapping paper to make my own bags, and mini bags out of scrapbook paper. Newspaper looks great too, so many fun ways to make handles as well.
niiiiiiiiiiiiiiiice!!!
is a great idea for some gifts!!! and the best is you can recicle!!! thanks :D
saludos!!!
This is fantastic!! I'm seeing this made from the comics section for kids, the sports section.... thanks for sharing this great idea!
Where's the diagram? It didn't show on my screen.
I just meant that photo showing the folds with all the measurements marked on it. Did that show up for you?
This is a great tutorial. Thanks.
I'm never buying a gift bag ever again! Thanks!
This is a great how-to, I can't wait to try it!
I added it to my weekly link picks over at Small for Big too.
http://smallforbig.com/2010/07/modern_toy_storage.html
Thanks!
71 comments! wow! everybody like that post and me included! Super nice and recycled too.
Helena.
Found you through Punctuation Mark. Great blog and ideas.
I am now a new follower, hope you'll come visit me.
http://bellagetsreal.blogspot.com/
Cool! Your blog is AWESOME. I have a similar tutorial with a downloadable pattern, but to make a little mini gift bag out of magazine pages. Check it out for teeny tiny gifts! :-)
http://www.junkmailgems.com/DIY_Giftbags.html
Love this tutorial. I made a teeny tiny one and blogged about it here: http://thecraftynomad.blogspot.com/2010/07/from-trash-to-treasure.html
Thanks for sharing all this stuff with us Jessica!
these are super cute. I used to do something similar with wrapping paper around valentines day for my staff! Looks like I'd better start saving those news papers! :-D
Have to try this one, looks really cool!
Thanks again
I wonder how well this would work with the glossy paper from the ads instead of newsprint. Then you get color, glossy, and it doesn't turn your fingers colors! I'm bookmarking this - our MOPS (mothers of preschoolers) group may use these for our "new mom gift" bags for moms at our local hospital instead of buying in bulk at Michael's! Could use free parenting mags that I've got all over!
Yeah a new project for me and the kids!
bah! This is so cool. bookmarked!
Wow! This is really clever. Green and a money saver.
This is just toooooooo cooooool.
THanks so much for doing this tut....love it!!
i can't wait to try this out!
yes love this.....thank you I have always wanted to know how to make paper bags.....this is great thanks again...loving it
Oh my goodness, this is FANTASTIC! Love love love it. Thank you so much!
what a fun idea!
very very interesting!!!! thanks for sharing!!! I'll come back to read more....!!! Besitos!!
I just loved this too much that I had to post you as my Friday's featured blogger. come by Friday to see my post about you....
http://bellagetsreal.blogspot.com/
and maybe give me a follow!
Oh, yeah. Love How About Orange! Great tutorial. Love the cut lines on the pictures and how to add eyelets!
This is fantastic!
Thank you so much for sharing such great design. I love How about orange.
Love it. Eco-chic! Thanks for sharing. Off to save my newspaper from the recycling bin.
Brittany
http://www.prettyhandygirl.com
Love the tip, thank you!
Spraying fixative on the newspaper saves my fingers; Kumi Himo Braid from leftover thread/yarns, etc., makes nice handles; and using craft newspapers for my Crafty friends delights them all! What an excellent diy and blog! Thank you!
Best. Ever.
that's great, thanks!
Very simple and green...
This reminds me of brown paper bag book covers we made when we were in school.
you always have the most useful posts. LOVE this!
Were can you get the eyelets that you used?
At Michael's, the craft store.
Very clever idea!! Thanks for the tutorial!
Tammy
Very cute!
Going to give this a try tonight. I'm thinking of making the handles out of old grocery bags, to continue the recycle motif!
-Stefanie
2ndChanceCreations.etsy.com
coolest bags EVER. thanks...posted about it here -
http://parentplanet.wordpress.com/2010/08/05/great-sites-8-5/
Instead of reinforcing with metal eyelets, I used the circles used with binder paper---one on each side of the hole. Thank you--my brothers are handicapped and we use open bags for all their gifts!
Year, that is a method of environmental protection, we should try our best to protect our earth.i will try that method.
How big of a bag do you think you could make like this?
Well, I made them today...and do you know what makes it SO much easier? Folding the bottom around a box. Makes for nice creases.
this is great!!!
This is a great idea! I am always looking for great 'repurposing' ideas. I have tons of magazines that are larger like rolling stones that are not worth anything. I could make some gift bags out of those i'm thinking. Thanks for sharing!
You never cease to amaze me! Thank you for this, I will be using it.
Love this! I linked it on my blog, I hope that is okay.
http://www.backyardfarming.blogspot.com/
this is amazing, i like it
Just delightful! Trial one turned out great. Making more for holders for hostess gifts.
TO STINKIN' CUTE. AND TALK ABOUT EASY PEASY. THANKS!!
Amei a dica da sacola, muito obrigada!
hey I like this technique to make paper bag from newspaper.
Thanks for sharing awesome idea with us.
Awesome! Thank you!
I'm in LOVE! What a wonderful way to reuse newspaper! I live by the three Rs everyday so this is right up my alley! THANKS! :)
Nice trick, great for the kids to experience recycling and reusing. I work for an electronic recycling company (www.pcrecycle.ca) and I feel that it is important to keep on teaching people to do it.
AFTER i MADE THIS i SPRAYED IT ALL OVER WITH HAIRSPRAY. IT KEEPS THE INK FROM GETTING ON YOUR HANDS AND IT MAKES IT NICE AND SHINEY
I just made these with the funnies from the Sunday paper....they look so cute. Thanks for the tutorial, I love your blog!
Well, well, I really enjoy reading your blog! The tutorials are easy to understand and seems do-able enough. I hope to try them soon. Wish me luck!
I would love to make some of these, but I am having trouble downloading the instructions.
Sherree, there isn't a file to download; the instructions are written out in the post.
Wow what an amazing post. I simply love this idea. I will try this too. Keep posting like this.
I am excited to get started this will be great and it gives me another reason to save newspapers.
Assim que vi...comecei a tentar fazer.o artesão é meu marido, mas também tenho alguma curiosidade. adorei esta sacola, depois conto como ficou ok? fátima helena
What a great idea! I love to use recycled materials to wrap gifts, especially around the holidays, but I never imagined that I could do this! Thanks for the how-to!
This is such a great idea! I write a blog called Life, Love, Green and I would love to feature this with your permission.
Let me know
Amber
lifelovegreen@gmail.com
Sure, Amber. See the permissions guidelines in my left sidebar.
oi,coloca o tradutor,no seu blog.BJ Adorei o seu pap
This is great. Thanks for sharing
I love this as everybody else, but I have a question. what happens if it gets wet?
Thanks.
Hi Regina,
It will fall apart, just like other paper bags. Also not advised would be lighting it on fire or running it over with your car.
wow)))its unusual)))its really interesting i thing.
I am addicted to needlework,handmade and crafting too.... if u want, u can check out my site http://www.oxima-homemade.com/en.html
Love this idea. Cute and green all in one.
I create crafts for kids and your shopping packet project inspired me new ideas thanks
A wonderful idea! Shows what can happen when our creative juices flow!!!
Love this idea!
I've shared it on FB:
http://www.facebook.com/pages/De-Estraperlo/278387536692
My Mom always wrapped children's gifts in the comic section. She said sometimes the kids would stop to look at a favorite comic before admiring the gift inside!
These bags would be great using the funny papers!
What a cool way to recycle too. I'll be sure to pass this on to my scout friends.
Wonderful, thanks for sharing!
Dot from NJ: I just can't wait to try this new craft. Thanks!
wonderful ideas, thank you. buy a newspaper on a birthdate of a new baby and make the bag of the day....decorate with pink or blue ribbon handles......
I've been browsing for packaging ideas that are kind to the environment and that are a little bit chic and your idea has definitely caught my interest. Thanks so much.
remarkably!great and simple!
i love this idea!!! if you tell me how to give you credit or how-ever the stumble thing works i will for sure do it!!! thats how i discovered it!!!!
AWESOME idea THANKS! I shared it on my blog:
www.theartandfound.blogspot.com
AWESOME idea THANKS! I shared it on my blog:
www.theartandfound.blogspot.com
I just made it and it came out beautifully! I made it 6 inches high and 5.5 inches wide to accommodate a slightly larger gift. Thanks for the idea!
This is great - I almost get sick to my stomach when I have to spend $3-$5 for a gift bag and it gets thrown in the trash! I'm going to get a stash made ahead of time!! Deanna, www.skinfizzical.com
Gostei muito!
Grata por compartilhar.
Beijins e ficunDeus
Waah, I actually tried this! Worked fairly well. I also reinforced the sides with card, but I covered the card in newspaper before sticking it in, it blends in a lot better.
I didn't bother with eyelets, I just threaded old shoelaces through and then tied them so I have a shoulder bag! ^_^
I had my exams today, and it was a perfect size for 4 pens, a calculator ruler and a rubber! However, due to the words on it, I wasn't going to risk taking it in the exam hall. Got loads of compliments though!
Another easy way is to start wrapping one end of a box like a gift, put a piece of cardboard or card stock on the end that will form the bottom and wrap it a second time, while only gluing the one end. Then fold the long strip of card stock or cardboard underneath the open edge and under once before gluing it secure to reinforce the top edge. This has worked great in the past for me.
Absolute Genius! Thank you for the tutorial!
I just used this tutorial to create a custom sized bag using wrapping paper and it worked beautifully! Thank you so much.
love the idea;thank you
I've used this idea with old calendars and it works great. The only problem is that calendars are typically 12x12 so you have to play with the measurements a little bit but they turn out great for smaller gifts!
Thanks for the tutorial!
Thanks for sharing how to create a gift bag from using newspaper!
Love it!
Love this! It's such a fun idea! Thanks for sharing. We will be featuring you on our blog ziggycrafts.blogspot.com Thanks for sharing!
Freaking great! Will be linking and making these for sure...
Awesome! Can't wait to try this. I have a ton of newspapers in my garage for recycling. Thanks.
Pat
Great tutorial, thanks!!
It's soooooo easy ♥ :)
Thanks for sharing
cooool idea,green friendly too.glad you could share!
I loved this soo much! Instead of newspaper I used old sheet music (except I taped sheets together and put the taped sides together) and it look awesome thanks!
Excelente explicação.
Gostei muito!
Grata por compartilhar.
Beijos e fique com Deus
Great tutorial! My sister purchased something from store in Prince Edward Island, CA and saved it for me. Can't wait to try it!
Great tutorial! I featured this on my blog today at www.ascrapoftime.blogspot.com
This is great. Thanks for sharing.
www.MixedKreations.com
I just came across your website; you are so creative! Thanks for all of the tutorials.
Thank you, this was useful for me :)
This is so clever - love it !
really nice! It's 11:45 pm & I'm doing gift bags from old callendar with cute bears... I feel inspired :) Thank u
This looks so cute -- what a great idea! Pinned it
Jenny
www.simcoestreet.blogspot.com
Thanks for sharing this great idea!
Thats perfect! Ive got a pile of Big Issue magazines that I want to turn into something long lasting and encourage people to use bags!
I used christmas paper to make the bag. It is not as sturdy as newspaper would be but I was in the festive mood. I think next time I will cover the newspaper with a layer of christmas paper. Thanks for the tutorial.
please could you make your instructions a bit simpler, i don't get how you made the bag shape when you said "glue the top flap along the length of the bag". nice idea though :)
Love it! No reason to hand gifts plain :p
How much does the newspaper bag hold? Looking at that glue, seems kinda weak.
I just found this tutorial on pinterest and I've already made three of the six I'm making. I work at a newspaper and think my coworkers will really enjoy these. Thanks for the great tutorial.
This is a great "green" idea - thank you for posting!
I have shared this over on my blog as well - I was in need of holiday inspiration.
http://www.handmadetlcreations.com/2011/12/are-you-ready-for-holidays.html
Thank you again! Happy Holidays!
My son's 1st birthday is on 31st jan... planning to try this :)
I think with your measurements it would with a magazine that has a staple binding (meaning the back and front covers are one piece). Now can someone please try it so i can enjoy more vicarious crafting?
This is AWESOME!!! I am going to repost it on my blog!
Waw this is such a great idea!
If you use butcher paper on the inside it will protect your items and will also be sturdy. A plus to this is you could color the paper to get a different effect or have the shiny side toward the inside and not have to worry about something seeping into the paper.
Great idea but I can't stand touching newspaper because of the black ink that gets on my hands.
I could see using the slick sales papers though!
Don't you just love how the simplest of ideas can look so fantastic. Thanks for sharing.
Hers turned out really cool, mine.....not so much!!
I worked for a Charity called Card Aid and the had these bags made in India by mentally ill people. The bags were really popular (we used them instead of plastic ones)
theguilfordgirl.blogspot.com
just another great use for something that most of us take for granted and throw away every day.
Thanks
Awesome! Gonna make me some of those! Thanks!
Really awesome!! Made one : ))
ma che bella sorpresa il tuo blog!!
E' ricco di idee e spunti creativi!!
Complimenti! :-D
How can I make the bag waterproof so that the news print does not stain.
Really good idea and easy to make. Thanks.
Anonymous, I don't think it's possible to achieve total waterproof-ness. You could spray it with a clear acrylic spray, though, to help keep the ink from rubbing off. Krylon Satin Finish might do the trick.
I would never take the time to do eyelets, but I bet clear reinforcements would do the trick :)
i wanna fabolous this is my simple request ......lolzz
Post a Comment