

How to make gift bags from newspaper
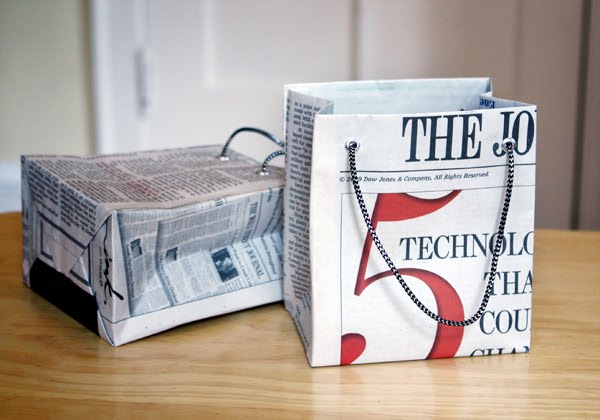 When I bought something at a store recently, the clerk handed me my purchase in a bag made from a newspaper. I liked it very much and had to make some more—thus today's DIY recycled newspaper project: gift bags made from the Wall Street Journal. You can vary the dimensions, of course, but here's what I used to create a bag that's 5" tall, 4.5" wide, and 3" deep.
 Stack two sheets of newspaper on top of each other. This will be a two-ply bag for extra sturdiness.
Cut out a rectangle that's 15.5" wide and 8.25" tall. If your paper already has a fold in it, align the existing fold with one of the fold lines in the diagram below, unless you don't mind an extra fold appearing somewhere on your bag. I cut out this rectangle, then flipped the paper over so the blue area would be on the outside of the bag. Fold a flap 1.25" down from the top. Fold a flap 2" up from the bottom. Then measure off and make vertical folds in the places shown in the diagram above. The front and back panels are 4.5" wide, the side gussets are 3" wide, and you'll need a 0.5" flap for gluing the bag together.
Cut two pieces of cardstock or chipboard to 4.25" x 1", then glue them on the widest two panels just under the top fold. These will reinforce the rim of the bag. Glue the top flap down along the length of the bag, covering the cardstock. Since the bag is two-ply, you'll need to glue both flap pieces down one at a time. Put glue on the outside of the 0.5" tab and bring the left-most panel over to form the body of the bag, aligning the cut edge of the panel with the folded edge of the flap. Add a little more glue to make sure the outermost sheet of newsprint gets tacked down, too.
 Upend the bag so the 2" flap is now up. Fold the short sides inward as if you were wrapping a present. If it seems easier, you could also lay the bag on its side and crease those folds against the table.
 Put glue on both flaps and fold them inward to form the bottom of the bag. Standing the bag upright and pressing down from the inside will help to secure them.
 Cut a piece of chipboard to 4" x 2.5" and glue it to the bottom of the bag to reinforce it and hide the flaps if you want to be an overachiever.
 Punch holes in the rim of the bag, adding eyelets if you like, and string some cord through the holes to form handles. Knot each end of the cord so it won't pull out through the holes.
If you want to store your bag flat, pinch the top together, fold in the sides, and bring the bottom up so that it lies flat.
252 comments:
«Oldest ‹Older 201 – 252 of 252 Newer› Newest»Just the idea I need for all those lovely card stock notices and ads arriving throughout the election season. I have a stack of them waiting for a job. They will be great strong stiffeners for these News Paper bags.
so cool! will defiantely be trying this
Love it, I'm definitely bookmarking this one!!
Another great way to recycle, you can use old square hay bale twine for the handles. Just cut 2 same lengths of bale twine tie a knot at each end and singe ends with a lighter so they don't fray. You can still put them thru the punch holes or staple them to the top of each wide ends of the bag.
just another great use for something that most of us take for granted and throw away every day.
referenced this great idea and your magazine bow on this post
http://4you-withlove.blogspot.com/2012/02/gift-wrapping-ideas-tutorials.html
These ideas are too good not to share!
Marilyn
4you-withlove.blogspot.com
Awesome idea! Thanks for the tutorial! Pinned it:D
I love this...thank you so much!
Thanks. This worked great. I used brown paper that I already had to make a large bag for a baby shower gift.
thanks a lot! it is really very helpful
WEEEEE
Thank you!! Been looking for this everywhere! One of my favourite little thrift stores now sell their things in these and since I got one I've wanted to know how to make them so I can give gifts in them!! :) x
Thank you for sharing, I will be making these for putting my Easter eggs in and other Easter treats to give to family members, what a fab use of the Saturday and Sunday paper!
Always looking for creative packaging ideas and this one is fantastic!
Awesome idea!! I love :)
These bags were perfect for my Trash to Treasure recycling party. Thank you for the tutorial. I credited you on my blog...
www.inviteanddelight.blogspot.com
Thanks,
Carole
I just 'stumbled upon' your great tutorial. It looks like a fun way to recycle. Thanks for sharing.
I LOVE this idea! I am very crafty and I WILL make some of these bags! Thank you very much!
bellissima idea!
What a fun idea to upcycle something! I have a stack of WSJ's on the table right now waiting for me...
I *love* this idea! I took your how to and made a bag using an old map for a friend as a travel gift. Hope you don't mind, I blogged about it (and linked back to your original post). http://crustcraftscurriculum.blogspot.com/
Thanks for creating such an amazing blog - I can't get enough!
these bags are also made by the street children of India. They sell them to earn some cash so they can buy food
Great idea!
Thank you so much for sharing this! I have been looking for a pattern like this for quite a while.
I loved making this gift bag. Thanks for sharing this awesome tutorial!
I shared your link on my blog today. http://simplymykitchen.com/gift-bag-treat/
aha. i like!
Came across lots of these bags when I was in India,where they're routinely used. I was just thinking I'd like to be able to make some of my own so this is great! Thank you!
awesome! Just making a gift bag for a handmade present, and this is the most informative gift bag how to i saw! I love the idea of making it from newspaper too they look so awesome and kitch! My mates gonna love em!
maps would look cool to
Thanks for the post, trying one today.
I just made this bag. Looks great & I love not spending money on wrapping. Thanks for the instructions!
Loved this. Turned out awesome and was really useful for the piles of newspapers I just end up taking to the recycling center anyway. Thanks for sharing the great ideas!
Fantastic bag!I love it! I have been into making small paper bags lately and have even posted one. Mine are smaller and probably easier to make than yours are but... check it out: http://www.craft-a-project.com/small-paper-bag.html
Wow
Has anyone said "calendar pages!!" yet?!?! This is so exciting.
How sturdy are these bags? Can the bigger ones hold a large candle without it falling apart? I'm also guessing they won't last very long in the rain either....
I love when people have really great ideas AND they share with others how to put it together in easy to follow instructions! Cool idea!
We made these from your instructions during an "Etsy Craft Community" Party at Creative Outlet Studios in Costa Mesa, CA, in June this year. Thank you for the tutorial- now to make more :) these are awesome bags!
I shot through all the comments already left very quickly but didn't see anything about using pages from those store brochures you don't need. Heavier and glossy, this material makes cardboard liners unnecessary. I just use regular paper folded in the bottom and it works fine. Super easy project. All we need is a spark, right?
Great!!
Omg mine came out stiff but its perfect for what I need so awesome
this is a great tutorial. i read it through at first and thought "what? there must be some missing steps or something" but then I went ahead and tried it, and following it as I did the steps made perfect sense! it was my aunt and uncle's anniversary yesterday so we made the bag using their favourite newspaper which we bought on the day! so this was awesome. thanks!
i would like to try it
What a fantastic and easy way to make a bag. You could use anything be it magazine or newspaper like you have done. Thank you for sharing this idea with us all.
Thank you. I will definitely going to try this.
Wow what a really interesting article. I love the newspaper idea it really is ingenious.
Very cool!!!! Will definitely try! Thanks for sharing the how-to
Thanks so much for making this because i have a competition and i could really use this!!!
Thanks again!!
OMG....I've bought bags and unglued them to try and use them as a template to make gift bags for my students with extra school newspapers. Ya, the only thing that got 'unglued' was me! I gave up!
I'm so excited to have found your blog. I'm going to make a template with card stock and just use the thin VENOM RUBBER GLOVES (painting department) from Lowe's to avoid the newsprint smearing on my hands.
My step dad used to run the Sacramento Union newspaper and his bday is coming soon. He will LOVE this!
Mil gracias.
Great gift bags and wrapping paper theme, especially for the people who work at your local paper office:)Thanks!
This is an extremely helpful and cute DIY! Wonderful idea. Thanks :)
Wow- Looking so beautiful!!!!
Great Idea!
Post a Comment