

DIY printed tote bag using the sun

I added a design to a blank tote bag using light-sensitive Inkodye and a stencil cut from freezer paper.

Inkodye is a water-based dye that works on natural materials like fabric and wood, and develops its color in the sun. It dyes fabrics permanently, and I like it better than fabric paint since it soaks into the fabric and keeps it soft and flexible, unlike fabric paints that can be stiff and sit on the surface of a textile. Plus, it's really fun watching the color develop!
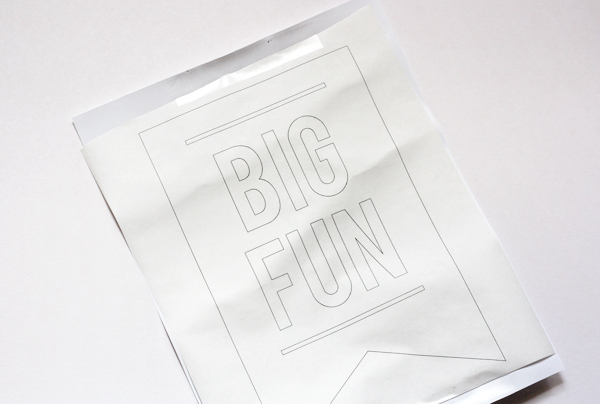
To make a similar tote, you can create your own design or download the Big Fun stencil I made.
Print the design and trace it onto the dull side of plastic-coated freezer paper, available at grocery stores. Or, save yourself a step and print directly on freezer paper cut to fit through your printer. Tape a piece of freezer paper, shiny side down, to a sheet of copy paper and print on it. It will come out a bit curly and lightly fused to the carrier sheet if you use a laser printer like I did, but it should peel off easily.

Cut out the letters and shapes. Remember that any empty hole will get filled with color, and no dye will go where the pieces of paper sit.
 With an iron set to the appropriate temperature for your fabric (likely the cotton setting), iron the paper pieces to the tote, shiny side down. The iron will very slightly melt the plastic coating, sticking the paper to the canvas. Give the pieces an initial quick, light press to make sure they're where you want them. If not, peel them up and reposition. Then press down firmly with the iron and make sure all the edges are sealed so no dye will seep under them. Once they're stuck down, the pieces are really stuck, and will probably tear if you try to peel them off.
 If there are any areas you're worried about getting dye— you know, if you tend to lose your mind a little and start painting outside the lines— mask those off with painter's tape. Place a piece of freezer paper inside the tote to prevent any dye from soaking through to the back side.
Then, in a dimly lit room, brush on Inkodye with a foam brush. Or any kind of brush or roller will do the job! Try for even coverage. The fabric doesn't have to be completely saturated; you just need a nice even coat on the surface of the textile.
(You can mix Inkodye with water to make it go further, if you like. A 1:1 ratio of dye to water will still yield maximum vibrance. Add more water to make pastels, or mix colors as you would paint.)

Blot off any excess dye with a paper towel.

Place the tote in the sun. The color will start to develop instantly! Here's the tote after 30 seconds, a minute or two, and fully exposed after 10 minutes.

Peel off the paper, my favorite part.

If you like, you can wash the tote with laundry detergent to remove any excess dye. Or just let it air dry and call it a day.

35 comments:
That's fantastic! Thanks for introducing me to inkodye! I was only just thinking of reupholstering my dining chairs with a custom screenprint but this looks so much better.
This sounds like fun.
Looks like big fun, to me!
Sorry,
Mum
I love this! So much! I need to try it immediately. Would make for a really fun gift, too. Thanks for the tutorial!
I've never heard of this stuff - but now I want to buy a crapload of tote bags and try it out!
Love this! Want to try it! Jessica you discover the greatest products :) Thanks for sharing!!
Does it need to be really sunny for this to work? We seem to be in perpetual gloom here in the UK this spring, and are anxiously waiting for the sun.
this DIY is real big fun! thanks and all the best julia
Sooo cute!
This looks great! Thanks!
Very cool. And love that brilliant orange!
I've been wanting to try inkodye for ages. I LOVE the nice clean lines you've got in this project!
it's great!
can someone tell me where i can find freezer paper in Europe?
janine
Stitchinscience, I read on the Inkdodye website that "light from overcast weather... will take longer but will work if there is enough light present." I thought I read somewhere else on there that on a cloudy day, it exposure time might be like 30 minutes or more. You can look around the FAQs there. http://help.lumi.co/
Janine, I don't know if there is freezer paper in Europe, I'm sorry! See if butchers wrap meat in white paper there... something shiny and plastic coated on one side with a regular paper surface on the other.
a little shoutout to Heathers or am I the only one who thought that? :) really adorable and easy bag!
@Janine: I found it at amazon "Quilters freezer paper"
Hope, thats some help :-)
@Jessica: Thanks so much for sharing, I'll definitly trying out inkodye!
Many greetings from Susann
Great tip, thanks!
There's no way mine would turn out so neat & crisp. None!
Can't wait to try Inkodye ! Is the special washing product they sell with the inks really necessary ?
No, you can use regular detergent. Maybe there's some advantage to theirs but I haven't tried any of it.
Such a fun and easy tutorial! =)
I love how fun and simple your tutorial is... I really could not pass it up and I shared it on my site craftingwith.me
That's awesome! You painted it very well :-)
wow, good idea. I think that we can do it but we are so lazy
it's looking very attractive you have painted it very well, i want to say it's really an admirable work, great creativity you performed, thanks for sharing this easy tutorial for making such kind of beautiful tote bag
I'd never heard of this type of dye, but it looks so versatile! I love what you've done with it, in other posts, too! :) Lisa
Where did you get the tote bag?
A local Tom Thumb craft store. You can find them at Michael's or Hobby Lobby, I bet. Or Amazon.com, or search Etsy for blank canvas totes.
Great tutorial! I am wondering where you got the inkodye. I have been to two craft stores with no luck. Do you have to order it online? Thanks!
Yes, you can order online here:
http://lumi.co/
Hi, thanks for the tutorial! I'm from Singapore as well and wonder where I can get freezer paper locally? TIA.
Ruby, I'm not sure!
Can you tell me what I would need to do to make a stencil for furniture using this paint? Thank you for any help you can offer. I think it is a great idea.
Regards
Debbie
daubin56@yahoo.com
Hi Debbie,
You'd need to have unfinished wood so the dye will color the natural material. It's not paint, so it won't cover over any stain or varnish. And you'd need to be able to expose all the areas of the furniture evenly to light. Here's a project I did with wood:
http://howaboutorange.blogspot.com/2011/08/picture-frame-project-with-inkodye.html
Post a Comment