
My local library recently advertised a class for making paperclip chandeliers. Sadly it was for 6th graders, but it piqued my interest. I went home and Googled paperclip chandeliers (awesomeness!) and that led me to Lauren Manoogian's paperclip statement necklaces. They were sold at arty shops, and even Anthropologie had a version for $168. Yeah, you read that right.
I was compelled to try it. They're the perfect, brainless thing to fiddle with while watching TV, or you could keep your kids busy for hours making chains. Make necklaces, or bracelets, or heck, garlands for your Christmas tree next December.
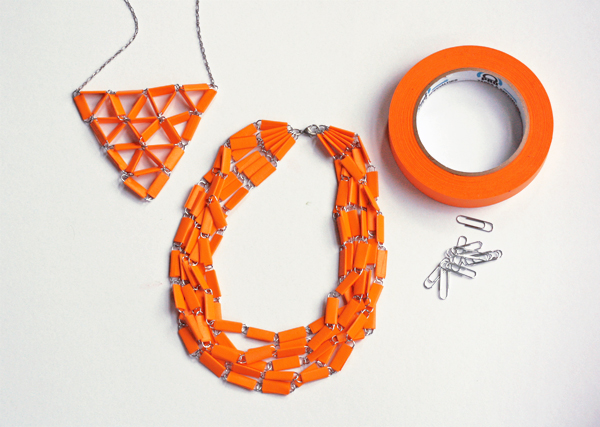
Supplies: paperclips, colored masking tape or electrical tape, and (optional) jewelry clasps.

Just wrap a piece of tape around each paperclip, connecting them in a chain.

Add optional jump rings and a lobster clasp (cheap supplies from a craft or bead store) if the necklace won't fit over your head.

This one has strands of varied lengths.

Geometric designs are popular right now, too. First lay out a paperclip pattern to plan your design. Pick up the first clip and wrap it with tape, then pick up the next, hook it on and wrap it with tape. One at a time, attach a paperclip and wrap with tape, adding rows as you go.

I'm on the fence about whether this is anything I'd actually wear, but the simple concept makes me happy.
Folks in Cambodia are making them out of food packaging. Or if you get super ambitious, why don't you go ahead and make a paperclip stair runner? Shouldn't take that long. Ha.
Great idea :)
ReplyDeleteCrazy! But cool crazy! I could see Miss C having all kinds of fun with this. Maybe I'd better hide my tapes, huh? ;)
ReplyDeleteMum
That is so neat!!
ReplyDeleteawesome Spring goodness in pastels! mahalo for sharing.
ReplyDeleteche idea strepitosa complimenti!
ReplyDeleteHow clever! I wish I had kept some of the paperclip collection I had when I was a kid.
ReplyDeletewow, it is amazing, it is so simple and yet so sharp, thanks.
ReplyDeleteLooks cool. And must be very lightweight. Does it make an odd noise when you move?
ReplyDeleteYep, it's light. It makes sort of a pleasant, beady sound. A quiet clacking. I kinda like it.
ReplyDeleteawesome! must try! i love your blog :)
ReplyDeleteWe used to make these in the 70's using strips of paper cut from magazines and newspapers and then gluing each piece.
ReplyDeleteI've seen a necklace made using sticky shelf liner paper in a marbled pattern rather than the electrical tape. Each "bead" had the appearance of a flat stone with metal loops coming out of the end.
ReplyDeleteOMG! I love these. You are so creative! I would never think of doing something like that. That necklace is so cool.
ReplyDeletehttp://thewebsterslifeandhomeimprovement.blogspot.com/
ohhh, it looks so easy to do! what a cool idea!, pinned it:)
ReplyDeletewow, this is sooo cool! Def goes on my list.
ReplyDeleteDora
I love DIYs I can use stuff I already have for. Thanks for sharing! I linked to this post on my blog: http://nocreationwithoutchaos.wordpress.com/
ReplyDeletei love orange colours
ReplyDeleteI too remember making them in grade school in the 70s. I think we used contact paper.
ReplyDeleteLove this! So glad your favorite color is orange too. Now I know what to do with that tape!
ReplyDeleteThumb up!!!
ReplyDeleteEasy, bright and cute! What a smart idea, thanks for sharing!
ReplyDeleteOh my goodness! What an absolutely creative idea. Thank you for sharing!
ReplyDeleteSmiles,
Rachael
The Joyful Thrifter
Absolutely love this project, Jessica! Thanks for sharing it! Wondering if you could also please share where you got your coloured masking tape? I thought washi might work, but it seems really rare to find it in typical masking tape size (about 3/4"), which seems perfect for regular size paperclips. Help?!
ReplyDeleteHi Sarah! It's from Blick, the art store chain.
ReplyDeleteThat is so cool! I doubt it would hold up to my baby grabbing at it though. ;)
ReplyDeleteI don't think you should be on the fence at all - both of these look great! You'd never guess what they were made out of unless you got up reallly close (and if strangers were getting that friendly, I'd be worried!). If anything they look pricey. On my 'to try' list...
ReplyDeleteLOVE LOVE LOVE!!! I don't think I have enough patience to complete something like that but way to go it looks great. I have found some neat DIY projects on http://cleanjewelry.com/category/jewelry-storage/
ReplyDeleteTHANK You so much for your post. I have been given the task to come up with some crafty projects to take to El Savador. Where a group of us will teach women that have been rescued out of human trafficing the craft that they can sell to provide for themselves. I can see this working for them. I am beyond excited!
ReplyDeleteSo happy to hear that!
ReplyDeleteamazing I made my own yesterday
ReplyDeleteCan I use Washi Tape instead of masking tape ?
ReplyDeleteSure! I've found that washi tape can be kind of translucent, though, so the design might get muddled if you wrap layer upon layer of it, and different layers show through. You could always wrap with white or cream masking tape first and add washi tape as the last layer, just going around once at the end.
ReplyDeleteHi! I just want to ask, how do you make the geometric necklace?
ReplyDeleteHi! I've tried to make the explanation a little clearer after the fifth photo. Hope that helps!
ReplyDeleteOMG! It worked so well! I made it and I'll be wearing it for my Aunt's wedding!!! Can't wait to show off!
ReplyDelete