
 Modular pieces that fit together make me really happy, and on a recent Google hunt, I found felt rugs here and here made with interlocking shapes. Very cool. So I tried a pared-down pattern for coasters because I'm way too impatient to fit 847,236,780 pieces together to make a rug.
 Download the PDF template right here (it makes two coasters.)
 Print out the pattern and pin it to a piece of felt. Use an X-acto knife (press hard) or a rotary cutter to cut the diagonal slot in each pattern piece. Then cut apart the pieces, adding the cuts on the sides.
 Grab four of the pieces and orient them as shown above. Each piece should be rotated 90 degrees from its neighbor, so that the ends with "arrows" are chasing each other around a square. Pull each arrow through the adjacent slot from the back to the front.
 The coaster will look like this when you've locked all the pieces together.
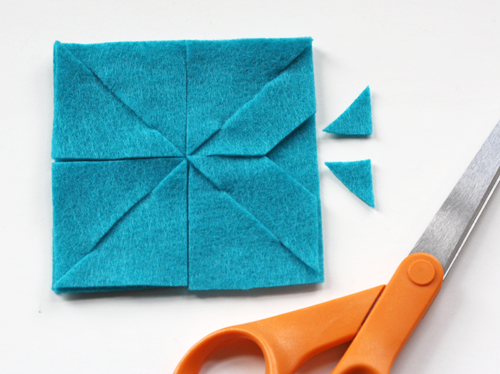 Trim off the points of the arrows. Also trim off any edges that stick out so you end up with a neat square.
To make a larger trivet, see my next felt project.

I like.
ReplyDeleteAww... tricky! And sweet! And nice color! To complement your orange, of course. ;)
ReplyDeleteMum
So cute! Oh, how I covet that orange mug...
ReplyDeleteCute mug. Ha ;)
ReplyDeleteNice idea, even if I'm not a coaster person myself. Maybe my boyfriend would appreciate those. ;)
ReplyDeleteWowzers, I am literally going directly to my craft room, having stopped only long enough to Pin both those rugs that you gave as inspirations! Thanks for hitting the nail on the head with a great project, as usual!
ReplyDeleteThese are so cute! Thanks for sharing, this will be a great rainy day/ use up my felt project for my son and I!
ReplyDeleteHow the heck did you figure out the patterning? I absolutely love the rugs, and would totally attempt to make one of my own, however I am not sure how to figure the pattern... Suggestions?
ReplyDeleteThat's tomorrow's post. :)
ReplyDeleteSo cool! I can't wait to try this out, maybe with two different colors on one coaster...
ReplyDeleteNice :) I want to try this! Thanks for the tutorial!
ReplyDeleteFabulous, always looking for coasters in this house....not sure if that says more about my drinking habits or my cleaning habits?!
ReplyDeletewauuu, love geometrical patterns, the color and the cup, many thanks!!
ReplyDeleteThank you so much for this post. I want to let you know that I posted a link to your blog in CBH Digital Scrapbooking Freebies, under the Page 4 post on Mar. 13, 2012. Thanks again.
ReplyDeleteVery fun! It reminds me of this modular dress, have you seen it?
ReplyDeletehttp://flavorwire.com/author/inhabitat
These are great! I think I'll make some in two-tones of green to take to a St. Patrick's Day party this weekend! Thanks for the great pattern. I really love your blog.
ReplyDeleteBetz, hadn't seen that! Fun is right!
ReplyDeleteM. Elizabeth, good idea.
Can not get to your pattern :(
ReplyDeleteHmm, it works for me. What happens when you click the link?
ReplyDeleteB E A U T I F U L !!!!! :0)
ReplyDeleteJust lovely!
ReplyDeleteThis is very creative and beautiful... I just may use this as a project for my daughter's 5th birthday party next month. (Of course I will do all of the cutting.
ReplyDeleteWhen I clicked on the link for the template, I got a page of numbers and letters. Please help.
ReplyDeleteHuh, that's weird. It works for me. If you try again and it still doesn't work, email me and I'll send you the file.
ReplyDeleteUnfortunately, it's not that easy. The cutting is tricky and it has a major impact n the final result. Maybe the rotary cutter needs more practice than I really do... Anyway, I'll keep trying, bought tons of felt.
ReplyDeleteI used an X-acto knife and a scissors. You could try that?
ReplyDeleteThat was very kind of you giving me some feedback! Thanks! As I live in Brazil, I don't think I can find an X-factor here... I've tried again, being very careful with the cutting and it turned out a lot better. Just have to be patient, as I'm not a craft expert :). Thanks for sharing!!
ReplyDeletewonder if a shamwow would work instead of felt it would absorb condensation better
ReplyDeletewere do you get these gorgeous colors of felt? Awesome tutorial!
ReplyDeleteA local Hancock Fabrics store.
ReplyDeleteI love this!
ReplyDeleteThis looks great! I'll efinitely try it ... I love the modular rugs.. do you know where to find a pattern to make them? I want to do this !!! Thanks !!
ReplyDeleteYep, you could blow up this pattern. I just updated this post with the link.
ReplyDeleteI love these, thanks so much for sharing! I'm thinking these along with a trivet or two would make cute little Christmas gifts. Nice to add to a basket with a few mugs and tea or coco mix and some cookies or scones.
ReplyDeleteThis is great! Thanks so much! I am gonna give these as gifts for the Holidays! Great tutorial.
ReplyDeleteWhat an awesome idea! It's like one of those wood puzzles =)
ReplyDeleteHow much fun would it be to give this to someone crafty in the unassembled version?